Sunday, July 28, 2013

Running For My Life


In the last 3 1/2 years, I have done a lot of things that scare me: living alone and thriving, starting a new relationship, leaving a job that was making me unhappy, directing harder plays, sharing myself online, and running. I have never been an athletic gal, but the dissolution of my marriage pushed me towards the gym and ultimately, road. I have run countless 5Ks, a few 10Ks, two Boilermakers (15K), and even a half-marathon. If you had asked me 5 years ago if I would do ANY of these things much less ALL of them, I would have definitely said, "Absolutely not!' Tomorrow, one of my closest friends and I begin our 12-week training program for the Empire State Half-Marathon and I am scared. I am more scared than I was before my first ever run.


Why? I have narrowed it to three major factors: 

1. My self-confidence: since being under-employed, I have lost what I thought off of my athlete's mind. I now fear since no one wants to hire me, I am not good enough to take on this challenge. My resolution that I could do anything if I trained properly is almost gone. 
2. My current physical condition: being home more and depressed about it leads to emotional eating. Being 26 miles from my gym membership doesn't help either. I have put on weight and lost tone...that is never a good place to be. I also desperately need new running shoes, but don't have the salary to purchase them.
3. Fear of hitting the wall: by mile 11 of my last half,  I was in pain. My knees ached. I had no energy. It was tough. I had to resort to a walk for a bit. I was upset. Looking back, I did not strengthen my hips and glutes enough, I over carb-loaded, I did not hydrate enough.  Knowing that will help me this time. We are following a Hal Higdon training plan and I am reading a great book on race training nutrition.


Look at that girl, she is a happy racer. During the next 12 weeks, I will be working on finding her again...enjoying my training, getting leaner (I hope!), conquering my fear. Wish me luck!


Friday, July 26, 2013

teany.tiny.stitches. for real!


Proverbs tell us that "The first step is hardest." or "A journey of a thousand miles begins with a single step." Well, I took the step. I figured if I was going to design and market a line of patterns, that first I needed a name and a logo. Two friends and I have a dream of opening an stitching shop with a tea bar and calling it "teany.tiny.stitches." Yes, we know that "teany" is misspelled. But we are going for a cutesy little joke. TEA. Get it? I love the name, so I decided that it suited this new venture. Since it is all about stitching, I knew that the logo needed to be stitched. So that is where I am in the process, if you can call it that.

Thursday, July 25, 2013

New Ventures, New Adventures!

I have always been a thinker and often-times, an over-thinker. Many people are guilty of this (especially women.) Since losing my job, I have had PLENTY of time to think. Sometimes, I think about my worth or lack thereof. It is truly amazing how much of our self-worth is linked to our jobs. It defines us and I felt as though I lacked definition. That is until last night...


After a fabulous anniversary dinner date/trip to the library with my sweetie, it struck me: I AM AN ARTIST. Therefore, I have a job. I have been given a gift: time. I get to experiment in the kitchen, garden, walk, take photos, sing and dance, enjoy the sun, see my friends, and CREATE. Sitting behind a desk would limit these experiences, so why am I moaning. I should be reveling in it.

I have decided to spend the rest of the time I have been given doing just that. I will be focusing more on creating embroidery patterns to share and to sell. I will complete that blasted set model. I will embellish. I will make. JOY!

Wednesday, July 24, 2013

WIP Wednesday: CS Lewis Embroidery


I really meant to be a better blogger. I have been taking photos all summer long...tons of food prep shots, a baziilion macros, gardens, waterfalls, and festivals. I had every intention of sitting down every evening and writing a blog post. Sadly, being unemployed and constantly looking and anticipating is utterly exhausting. The process takes your best intentions and whisks them away. I tip-toed in and made a few design changes. I have been making and planning. I am assisting my local bead store in a move/re-design. In fact, if it wasn't for the money (and therefore, the job) necessary to live, my life would be perfect.


I have been spending time each night looking at inspirational quotations on Pinterest. I truly think that I may take some and design a line of embroidery patterns like to one above. I am taking Mr. Lewis's words to heart, "Hardships often prepare ordinary people for an extraordinary destiny." 
Keep an eye out for the pattern here soon.

Friday, June 28, 2013

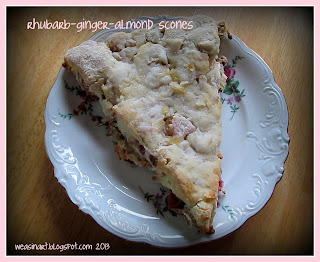
Foodie Friday: Rhubarb Ginger Almond Scones


If nothing else, this time of under-employment has allowed me to do things I really love: 
garden, sew, walk, read, and bake. I was especially happy to bake these scones. I developed a recipe after comparing a lot of different scone recipes. These seem old-fashioned and delightful, perfect for brunch with friends or as heart-felt handmade gift. 

Weasinart's Rhubarb Ginger Almond Scones:
Ingredients:
  • 3 stalks rhubarb (14-16 ounces)
  • 2 1/2 cups flour
  • 1 tsp baking powder
  • 1/2 tsp salt
  • 8 TBSP unsalted butter
  • 1/2 cup sugar
  • 1/2 tsp vanilla extract
  • 3/4 cup plain Greek yogurt
  • 1 TBSP crystallized ginger
  • 1/4 cup almonds
Directions:
Preheat oven to 425 F. Line baking sheet with parchment or silicon mat. Because I made my scones into wedges, I needed to use two sheets.


 Cut the rhubarb into small pieces. 
They will break down a little in the scone, but keep things bite-sized!


Toss the rhubarb with 3 tablespoons of sugar and the ginger.
 Dice the ginger fine, if necessary.


Chop the almonds and fold into the rhubarb mixture.


Sift flour, 1/4 cup sugar, baking powder, and salt together in a large bowl.


Cut butter into flour mixture until the butter is about the size of small gravel.


Add in the rhubarb mixture, vanilla, and yogurt. Stir together until a soft dough forms.


 Flour your hands and knead the dough for a minute or so, 
until the dough comes together and is not sticky.
Turn out the dough onto a floured surface and pat the dough into a disc. 
Using a bench scraper (or a knife), cut the dough into 8 wedges.
Arrange on sheets and sprinkle with remaining sugar and some of the crystallized ginger.


Bake for 18-20 minutes or until golden brown.
Serve warm and/or seal in an airtight container.

Enjoy! 

This post is dedicated to my all time favorite blogger, chef, and friend, 

Thursday, June 20, 2013

DIY Upcycled Clothes Pin Bag


When we are kids, we never truly value the cool things that are around us. I remember both my mom and grandma having a clothes pin bag that they scooted along the line as they hung out clothes. It was just there: something that always was. A part of life. As an adult, I have stored my pins in a wicker basket and have never been completely satisfied. It occurred to me that I wanted what we had growing up, but they are tough to find. Time to make up a pattern and get going!


Like everyone else that I know, I have a fabric stash. You could use something from there, use tea towels, old bath towels, a pillowcase, or do what I did: use part of a soft and sweet vintage sheet. It had been used so many times that it started to wear through and rip.
 A new life if in store for it here! I took a section about 14 inches wide (the width of the pants bar on my wooden hanger) and approximately 36 inches long.


I am obsessed so I knew that I needed to add some. I found this a local shop that resells donated fabric, trims, and notions a while back and have worked it in to many projects. I sewed a strip along the edge that will be the opening and another about two inches down. This is where you can be super creative with ribbon, applique, embroidery, whatever you love!


I knew that I wanted a pretty sizable bag, hence the 36 inch total length  but again you could make the bag whatever size suits you and your fabric. Once I sewed on the trim, I folded up the edge with right sides together. I sewed the sides up and turned it right side out.


Lastly, I sewed a strip of hook and loop tape to the top edge (which as nicely finished since I used the top edge of the sheet) and another strip about 3 inches down, both on the right side of the fabric. I folded it over the pants bar and loaded it up.


Ready to hang! 

Tuesday, June 4, 2013

Comfort Food Re-imagined


Being chronically under-employed has it perks: I get to work in the garden more, I get to hone skills, I get to spend many of my days with my students, I get to try some new things that I did not have as much time for before. It also has its pitfalls: depression comes in waves, I am unmotivated to do new projects, and I eat...more than I should. As many women before me, my go-to stress snacks are sweet and crunchy. Ice cream though is expensive and fattening. Enter chocolate banana "nice" cream sandwiches!

Sunday, June 2, 2013

Sunday Funday: DIY Terrariums & Rock Gardens


In this time of diminished employment (I did not get the job, btw); I have been doing a lot of gardening. I have put in many hours in my herb and veggie gardens, at our plot at the Community Garden, and at my favorite guy's place. My house itself was feeling a little neglected. We unearthed some moss and I was recently gifted a miniature boxwood. You know what that means?! Rock gardens and terrariums. 

Wednesday, May 29, 2013

Back from the Dead...with projects!


When you decide to become a blogger, you always have great intentions: posting valuable and timely content, being engaging and interesting, taking eye-catching photos. Then life happens. Careers change. Relationships need work. Self-confidence and self-worth plummet. Well, not always, but that is what happened to me.

Monday, February 18, 2013

Working today for tomorrow

Some of you out there may think that I am a little scattered: jewelry-making, cooking, crocheting, felting, embroidery, plays, fitness, work, and now art. It may be true, but not in a bad way. For as long as I can remember, I have liked to stay busy. As a child, I had a vast imagination and could spend hours playing with Barbies or reading books. Summer reading challenges were no big deal for nerdy lil me.

As I reached adulthood, I have tried to maintain my imagination and creative spirit.I enjoy branching out and learning new things. I have always been fascinated with fonts, layout, and text (hence my metalwork) and my new online classes are fueling that fire. I think that they will really help me with my eventual goal of publishing my own embroidery patterns.

I realized, as I carted art supplies through the house that I have dedicated spaces for sewing and jewelry-making, but not "standard" art. Enter the new art space:


I want to make a line of patterns inspired by the Dowager Countess on Downton Abbey. Some possibilities above.


My first Downton pattern! I will stitch it up soon, refine the pattern, and post it here soon!

Thursday, February 7, 2013

Elementary School Time

Last night, after dinner, I opened my new packages of pens and cracked the spine of a new composition book. It felt like the first day of second grade...and I loved every minute of it. I spent two and a half hours tracing lines onto graph paper and carefully printing out the alphabet. Seriously. And it was awesome.


It was not just repetitive movements and the scratch of the pen, but rather it was my mood lightening and lifting. By the end of the practice, I was happy and smiling. I felt super-creative and calm, kind of like meditation. I can't wait to practice more and learn more fonts and get designing!


Practicing my blog name, (someday) business name, and the tried and true typing phrase :)


I also worked on the journal cover for the second class which is more advanced lettering. This was a great investment of $70...2 classes, a creative outlet, new skills, and a refreshed Weas!

Wednesday, February 6, 2013

Art Class for Grown-Ups!

If you are a regular reader or my friend in the real world, you know that: A. I love learning new things, especially even art/craft-related things, B. I am a huge nerd and actually enjoy talking classes, C. I adore new supplies. D. I would like to design my own embroidery shop and design my own patterns. True story.

Last week, when the favorite guy and I were on our weekly library date, I found this gem:


52 drawing labs! I am so excited. I rushed out to stock up on more supplies and jumped right in.


I have spent a little while everyday working on a lab or two. It is challenging yet rewarding. 
Some samples from Lab 1: Drawing Cats in Bed


Thursday, January 31, 2013

Smooth Sailing


Everyone falls off the fitness wagon every now and then, myself definitely included. I don't get crazy, but a few too many cookies at the holidays really add up. Given that, I always start the year a little down. You'd think that I would learn my lesson, year after year. 
I am only human, I guess.

This year, I have made a few more changes that I hope will stick. I have not eaten ice cream or fried foods (other than 3 onion rings) all month. That is a HUGE deal for me
. Ice cream could be a food group. 
I have made lots of smoothies, soups, salads, and other healthy make-ahead meals. I have started tracking my food and activity. It makes me feel more accountable.


Wednesday, January 30, 2013

WIP Wednesday: Flannel Coziness

I love to putter around with my sewing machine. I like the methodology of sewing quilt squares and the whimsy of making up projects as I go, like my mason jar cozy. But I am a big girl, it is time to make something from a pattern. 


I figured that I would start off by making something that no one outside my house would see.
I am especially partial to long cozy nightgowns, so that is where I shall begin.
Even though I purchased the right amount of yardage for the pattern and followed to layout directions, I COULD NOT get all the pattern pieces to fit. No biggie, I am going to make the pocket, hood, and yoke from a coordinating fabric.


I will keep you posted on the construction progress, though I do need a little help with the pattern instructions in places. Wish me luck!

Tuesday, January 29, 2013

How Tuesday: Tray Upcycle


Sometimes, everyday things need just need a little spruce up. Perfect example, this tray. It originally held programs at a formerly important event and then got a quick coat of brown paint and stored supplies under a now defunct aquarium. I admit to occasionally enjoying a meal in front of the TV. Let's be honest here, doesn't everyone? The pain is making multiple trips to/from the kitchen. Inspiration struck while watching Downton Abbey. Watching Carson and the footmen carrying in tea and such on nice trays and salvers, I  devised a way to redo the tray in a way that even the Dowager Countess would approve.
   

The tray is wooden, from the craft store. It was originally cream with gold trim and then hastily covered with brown craft paint. Not very appealing. For this upcycle, I painted the tray with every crafter's secret weapon:  GOLD SPRAY PAINT!


Next, I trimmed a piece of cardboard the fit inside the tray, allowing a little space for fabric.
Sadly, I forgot to take of photo of the fabric covering process. I simple cut a piece of fabric with pinking shears a little larger than the cardboard. I sprayed the cardboard with craft adhesive and wrapped the fabric around it, folding hospital corners so it would lie flat. I placed the fabric-covered cardboard in the tray and was ready to go. I did not tack the fabric down so that I could launder or swap out the fabric as desired.


My Downtown worthy dinner on a tray that Carson would be proud to carry :)


Wednesday, January 23, 2013

WIP Wednesday: Embroidered Project Bag

We, as a culture, tend to take things for granted. As I have often said, time is one of those things. Another is vision. I have not been able to be as crafty as I would prefer lately, but now that me new "eyes" are here I am stitching up a storm.

I am currently working on project bag for myself (gasp!). The bag is based on a pattern by Jenny at Sublime Stitching. Seriously, get over there and buy some patterns. You won't be sorry.


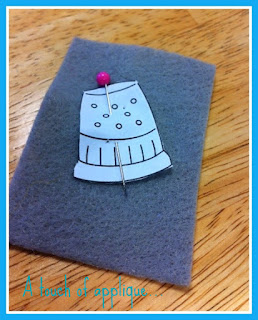
Although it a full-on embroidery pattern, I have decided to do some applique of certain elements.


The thimble kind of resembles a Dalek. I am okay with that.


I am about a third done. I will be adding an embroidery hoop using this  process, adding a rick rack border, and embellishing the handles. Once the bag is complete, I am going to make some internal tool pouches. I'll keep you posted.