Monday, April 30, 2012

Metalwork Monday: Folded Flower Pendant

Being sick has one or two tiny advantages. Instead of roaming around spreading the plague, I have been able to do lots of designing and some creation between meds, tissues, and tea. Yay!


I spent time this week experimenting with new techniques and tools and am pleased with what I have learned. Stay tuned for future posts featuring these great new design elements! 


One of the simplest new techniques that I tested was folding my flowers rather than dapping or doming them. It needs a little refinement, but am happy with my first attempt!


I folded and curved a nickel and copper flower blank and
riveted them to a brass filigree flower to create the pendant.

The tools: blanks and filigree, hole punch, design stamps,'
round nose and chain nose pliers, rivet/riveting tool, hammer,
bench block, marker, liver of sulfur.

I drew a large asterisk on each flower. It is a little
messy, but they will buff out when I polish them.

I punched a hole in the center of each and stamped
the edges of each flower.

I used my chain nose pliers and folded each flower by
placing my pliers on the marker lines and bending
the flower towards the pliers with my fingers.
After I bent the flowers all the way around, I used the round
nose pliers to curl the ends of all the petals.
Because the hole in the filigree is larger, I also punched
a hole in a small copper blank to hold the rivet on.

I layered the 4 pieces and attached all three with an eyelet.
It is ready for a jump ring and chain!

Sunday, April 29, 2012

Sunday Funday: Lace Bowls

Today is a simple post, a simple craft, and a simple joy. Now I can look at lace everyday without feeling like I am a doll or a Mrs. Havisham.


Using a lace bowl to display shells that we collected
on our last vacation.

Choose bowls of several sizes to match your doilies
or pieces of lace. Cover entirely with plastic wrap.

Totally saturate the entire doily in liquid starch.
I looked at the local grocery stores, pharmacies,
and Target and had to resort to buying it at Wal-Mart.

Drape each saturated piece of lace of the bowl
to mold it. Smooth down and shape as necessary.

A beautiful way to display items throughout the house.\\
I am using one for bananas in my kitchen :)

Saturday, April 28, 2012

Stitchy Saturday: Lace Headbands

Wearing lace can be a little tricky. A gal can end up either looking like a baby or a granny. That's why these headbands, designed by the super-talented ladies at A Beautiful Mess are perfect. Their design was for a head band using three types of lace, but I decided to experiment with some single pieces of wide lace too.

I only planned on making one. But, I ended up with four
and plans to make more.

The original design called for lace to tie under your hair, but
thought that ribbon would work better and be a
little more fun.

Measure across the crown of your head, from just under your ear.
Cut one-three pieces of lace and 2 pieces of ribbon.
I used 12 inches of ribbon per side.
I stitched the ribbon to the lace with embroidery floss.

Perfect for a busy day in the studio.

Six hours later, and my hair is still in place :)


Friday, April 27, 2012

Foodie Friday: French Lace Cookies

Lace is delicate and airy, and so are these cookies. Perfect for a special afternoon tea or to be served with a tasty homemade sorbet or ice cream. 


Ingredients:

1/2 cup pecans
10 tablespoons (1 1/4 sticks) unsalted butter
1 cup packed dark brown sugar
1/4 cup light corn syrup
1 tablespoon heavy (or whipping) cream
1 teaspoon pure vanilla extract
1/4 teaspoon salt
1/4 cup all-purpose flour
1 1/4 cups old-fashioned rolled oats


Directions:

-Preheat oven to 350°F.
-Line a cookie sheet with parchment paper.
-Spread the pecans on a small baking sheet and toast for about 7 minutes or until lightly browned and toasted. Chop into small pieces.

-Melt the butter in a medium saucepan over low heat. Remove from the heat and, using a wooden spoon, stir in the brown sugar (making sure there are no lumps remaining), corn syrup, cream, vanilla, and salt. Stir in the flour, then mix in the oats and chopped pecans.


Drop the batter by slightly rounded teaspoonfuls, arranging at least 3 inches apart. (These cookies spread until they're paper thin, so don't place them any closer together or make them any larger. You should be able to get 9 cookies per standard cookie sheet.) Bake in the middle of the oven for 6 to 7 minutes or until the cookies are bubbling and golden brown, a little darker around the edges. Transfer the cookie sheet to a rack. (Alternatively, slide the parchment off the sheet and onto a rack.) You could also use a dowel or cannoli mold to curve theme around at this time.Wait about 2 minutes for the cookies to firm up. Using a wide metal spatula, carefully transfer the cookies directly onto a rack to cool.


Store in an airtight container for up to 5 days, but they won't last that long!
Recipe adapted from Cooks.com.

Thursday, April 26, 2012

Sprucing up my storage: DIY Lace Ladies

As I may have mentioned earlier this week,  I may have an extensive lace collection. My favorite pieces are old and handmade, but they were languishing away in a storage box and not really being enjoyed or appreciated. That is until I came across this post by Creative Carmelina! 


I used her general idea, but utilized different ladies from The Graphics Fairy and slightly different materials and I am very pleased with the results!


I feel all fancy now. They are on display in my sewing area
to inspire me while I work.

I sized the graphics on my computer and printed them out in color.
It would also be fun to play around with sepia and back and white.

I attached each image to a heavier backing with a glue stick.
I did the first two on illustration board, but it was VERY difficult
to get clean  cuts. I applied the rest to a recycled shirt box from
my wrapping stash.

I added a 4 inch (okay, except for one that messed up) "leg"
portion to wrap the lace around.

Part of the stash! I used a tiny piece of tape to adhere
it to the legs and them put a pin in it to secure the end to the
rest of the lace.

Ready to display and enjoy!

Wednesday, April 25, 2012

WIP Wednesday: Lace-covered Shoes

Pinterest is a tricky things--fitness tips and decadent recipes, beautiful products and awesome DIY projects. Sometimes, my pinning eyes are too big and I get excited to do hundreds of fun ideas. Of course, who has time to them all. This girl is making time! A very popular pin right now is for fabric/mod podge shoes. I decided to take it to a Weas level and cover them with lace.


Supplies:
-Shoes
-Lace
-Mod Podge
-Foam Brush
-PLASTIC WRAP
-Clothes pins

Cover the shoes liberally with mod podge, starting in the front.
Because I used canvas shoes, I filled the toes with tissue paper.

Use a piece of lace slightly loner than the shoe. Starting from the
fron,t pull the lace over the shoe. Split the lace over the opening of the shoe
and smooth over each side.
I used clothes pins to secure the lace while the glue was drying.
It was a good theory, except the pins stuck to the glue :(
Next time, if I use clothes pins, I will cover the shoe with plastic
wrap first.

Use an exacto knife to trim the excess lace around the sole.

Wear and be prepared for the compliments!

Tuesday, April 24, 2012

How Tuesday: Printing with Lace


I enjoy being girly. I am obsessed with dresses, painted toes, and fancy pastries. What is more girly than lacy stationary? Nothing. Here's how you do it:


The finished product!


The supplies include:
-blank cards or card stock
-lace
-brayer (it would be even better to have two)
-glass surface (I used an old collage frame)
-block or screen printing ink
Using the brayer, spread a layer of ink onto the glass.
lay the lace on top and run the brayer over it until the
lace is saturated.
Place the lace on the card. Cover the lace with a piece
of paper and roll a clean brayer over it. I only had one, so I used a can
from my pantry,
When printing photo mats, I used painter's tape to create mitered
corners. Place the tape in the corners, print the area, and remove the tape.
After 30 minutes, place the tape on the already printed sides and complete the frame.


Now you can share your girly tendencies with the world! Perfect for
wedding or shower invites, birthday cards, or just staying in touch!


Monday, April 23, 2012

Metalwork Monday: Lace-etched bangle bracelet

I have an admission to make. I have an addiction to vintage sewing supplies--kitschy fabrics, retro trims, and most of all; lace. My lace collection is embarrassingly large. My favorites are hand-crocheted or tatted, but I also have two boxes full of bolts of lace, both old and new.


Hence, lace week. 


Metal etching is the trend of the moment in Funky Monkey Studio and I have just learned to print with lace (check back tomorrow for that tutorial), so I combined them into a great new design. So exciting!


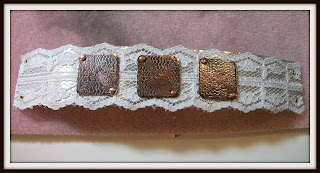
Lace-etched copper plaques riveted onto a bangle with a
lace overlay.

Using block-printing ink, a brayer, and a piece of lace, I applied a
resist to the plaques. I etched more pieces than I thought I
would use so I could choose the best etchings. Before I printed the copper,'
I mounted them to the sticky side of packing tape to prepare them
for the acid bath. More details on lace/ink printing in tomorrow's post.

The plaques spent 30 minutes in the ferric chloride bath.
I use recycled take-out container for the bath. The tape on the edges
of the bowl suspends the metal just barely in the acid.

After coming out of the bath and having a quick rinse, you can see the
lace pattern. I polished the pieces, used the Dremel to round the corners,
and oxidized them in liver of sulfur.

Using my French Shears, I cut the bangle blank. I used the
Dremel to round the corners and texture the piece.
I used the sanding block to smooth the edges.

I added a piece of lace over the bangle blank and used my
riveting/eyelet tool to attach it. I then added the
copper plaques and attached them with copper rivets.
The lace is attached with four brass eyelets.
Before forming the curve, I stained the lace with strong tea
brushed over it with a flux brush. I did four coats of tea to
get the shade I wanted.

Formed and ready to wear. I used both the bracelet mandrel
and the bracelet-bending pliers to achieve the  finished
fit and look.

Sunday, April 22, 2012

Sunday Funday: Let the sun shine in!

Today is a grey day, inside and out. The weather is going downhill...it was 90 on Monday and flurries are in the forecast for tonight. Ugh. The up-and-down weather is going hand-in-hand with my mental roller coaster. I am trying to make some life-changing decisions. Scary stuff. Right now, I need a little more sunshine to help me out. 

Luckily, earlier this week, I finished a quick little sun catcher project to keep the sunshine in.
It is nothing super-difficult like stained glass. It is a project that you could easily do with the kids!

My sun catchers add a little something extra
to my studio windows.

First, I traced my designs onto vellum paper. I purchased
mine at a local art supply store but you can
easily find it online.

I cut some tissue paper into squares to decoupage
onto two of the circles. 

They curled as they dried, so I sandwiched them
in plastic wrap and weighted them as they dried.

I painted others with watercolors that I heavily diluted.

These curled as well, so I used coins to weigh
down the edges.

Once the dried, I mounted them on the window with
double-sided tape. If you wanted to hang them, you could create
frames from card stock to mount them in.

You could also use vellum to add a little something extra to cards and invitations.